12.16.2013

How To Sharpen A Pencil.


This is the next video in my sharpening series... 


HOW TO SHARPEN PENCILS from Pricefilms on Vimeo.


In all seriousness, however, he has a nice workbench (albeit one with a tool tray) and it looks like he has some decent saws sitting underneath said bench.  Maybe I'll start a pencil sharpening business and finally build myself a workbench.  

12.09.2013

Get A Handle On It.

I'm in the final stages of finishing my salvaged (mostly) Douglas fir home entertainment center.  This is one of many, many projects I am trying to wrap up inside my home before I can really justify spending some time building much needed tool storage and furniture (cough** Roubo bench... cough**) for my shop.  All the fir, with the exception of the plywood, started (a hundred years ago...give or take) as interior doors in two row homes in Baltimore.  When the homes were demolished, I was able to salvage the doors through a local salvage resale company that was working with the demo contractor.  I used a combination of a DeWalt benchtop planer - for cleaning off years of grime and paint, a bandsaw - to get rough dimensions, and handsaws and hand-planes to get the lumber to its final dimensions and finish.  I have had to be very judicious on the use of this lumber, as I am limited by the dimensions of the door rails and stiles for my pieces, and the fact that I have a very limited supply.

In an effort to reduce the amount of lumber I used, the entertainment center I had envisioned had a lot of open shelving.  After using it for a few months with open shelving, however, my wife and I realized that we are way to lazy to be "open shelving people."  So, in an effort to hide clutter (heaven forbid we just organize things!) I needed to build some sliding doors.  The sliding doors I built are very simple, no frills, clutter hiders.  I am glad that I went with simple though, because this built-in really didn't need another design element.  The idea was to have something peaceful to look at while we sit and vegetate on the couch.

The doors are just butt jointed rails and stiles with dadoes cut in to hold the Douglas fir plywood panel in the center.  The main door I held together with Jatoba splines, and the other two are just tacked in to the plywood panel (cheating, I know...).

Nothing Fancy...
The doors are hung in their openings on cheap sliding closet door hardware, which works surprisingly well.  As soon as I finish the openings I'll post some photos of the completed entertainment center.  The doors, however, really needed handles.  They were hard to open and close by just grasping the stiles.  This gave me the perfect opportunity to try out an idea I had seen in a magazine (I believe it was a Popular Woodworking issue, however, I can't seem to find the article).  Integral carved handles for sliding doors.

Here Are The Tools I Used
Integral Handle

11.27.2013

Reclaiming America.

Some of the most beautiful lumber I have ever seen was felled over a hundred years ago and was put into an attic.  Unfortunately, it wasn't for sale and if I had taken it, the building I was in would have collapsed.  The lumber stood as massive beams in an old mill I was invited to inspect.  Wood that is nearly impossible to get anymore often resides as forests of structural members in old buildings now.  It is for this reason (among many) that I love reclaimed lumber.

It breaks my heart when I see a demolition site with piles of old growth timber heaped in dumpsters with all the other demolition waste.  Fortunately for those of us obsessed with wood who enjoy beautiful lumber, some folks have made a profession out of working with demolition contractors and building owners to salvage lumber from old buildings.  One such company out of Cambridge, Massachusetts is doing just that.  Longleaf Lumber reclaims lumber and mills the salvaged wood into all kinds of beautiful architectural goodies.  They also have a soft place in their hart (see what I did there?) for woodworkers.  In addition to inventorying lumber for woodworkers in their showroom, they have started a friendly competition amongst wood fanatics.  The contest is called "This Is the End Grain."  Once a month they will post a photo of end grain lumber on their facebook page and accept guesses as to the type of wood.  They'll randomly select a winner from all the correct guesses, and it seems that prizes will be "reclaimed, wooden, and gorgeous."  Maybe in the spirit of eliminating some of my competition I shouldn't have posted this here!

In all seriousness, however, I really respect what the folks at Longleaf Lumber are doing.  Getting people talking about, and using reclaimed lumber helps connect us to our past and gets people thinking about conservation.  Just think, many of the timbers they are salvaging were growing while the pilgrims were sitting down to the very first Thanksgiving.

Here are some videos I found which are about Longleaf Lumber and the work they are doing.


11.21.2013

Just Shoot Me.


If you have one of these:

 You should make one of these:
(Psssst...It's A Shooting Board/Bench Hook)
Here is how I made mine...

11.14.2013

"The Ox" - Words Fail Me.

O.P.V.
Other People's Videos

I was in the middle of writing my post for this week, and I paused for a moment to watch a video (I'm easily distracted and I'm a short film addict).  After I watched the video, I sat speechless for a moment and put my post on hold so I could share this beautiful piece with you.  

Everything about this short film impresses me.  I am constantly searching for inspiration, which is partly why I love short documentaries about craftsmen, and this film didn't disappoint.  Mr. Eric Hollenbeck owns and operates Blue Ox Millworks out of Eureka, California.  He and his wife Viviana operate an architectural millwork company on the site, however, they also operate a school and a historic park on the grounds.  Outside of the millworks the Hollenbecks also maintain a huge collection of human powered equipment from Barnes Manufacturing, a functioning blacksmith shop, a ceramics studio, a boatbuilding area, an apothecary where they make their own stains and varnishes, a plaster shop, a working print shop, a logging skid camp, a cook shack, a cafe, a herd of animals (including two Belgian Blue oxen), and knowledge and equipment for just about any other craft you could imagine.  I bow before this man in true "I'm not worthy" fashion.  I also enjoy his candor about his military service, his well thought out spring analogy, and the way his school is planning to help other veterans.

The director, Ben Proudfoot, should be immensely proud of his film.  There is a lot going on in this ten minute spot, yet he has managed to keep it all cohesive and at the same time wrapped it in a beautiful package.  I can't wait to watch his other films and I hope he has another coming soon!

Brace yourself for the overwhelming urge to run to your shop and make something.


11.07.2013

Give Thanks.

"If you are really thankful, what do you do?  You share." - W. Clement Stone

It is the time of year, in America, where we are encouraged to to name the things for which we are thankful. I am really thankful for a lot of things this year, safer welding helmets, x-ray vision, mind control, twerking, The Lady's Brunch Burger, and this!  On a more relevant note, I am really thankful for folks willing to share their woodworking, toolmaking and maker experiences online.  I wrote a ridiculous article on this serious topic a while ago: World Wide Woodworking.  My belief in the willingness of woodworkers to share, both good and bad experiences, was reinforced this year at the WIA conference.  Nine online pioneers were asked to speak at an "online round-table" to discuss what they do, why they do what they do, and some of their experiences.


This round-table, to me, was just as useful as the excellent class on cutting dovetails.  Kudos to Ms. Megan Fitzpatrick and her staff for putting this together.  So many woodworkers both brand new and "well-seasoned" don't have access to costly classes, conferences, or apprenticeships.  The dwindling emphasis on the industrial arts in schools also means that these skills aren't necessarily being taught in classrooms anymore either.  The large (and growing) group of online makers has encouraged many people, especially of the younger generations, to try making something with their hands.  Those folks then are able to share what they made, with thousands of people, with just the click of a mouse.

The group of folks chosen for the WIA 2013 online community round-table included:
(from right to left in the photo above)
Ellis Walentine of Woodcentral.com and formerly of American Woodworker Magazine
Matt Vanderlist of Matt's Basement Workshop
Shannon Rogers of The Renaissance Woodworker
Wilbur Pan of giant Cypress
Mark Spagnuolo of The Wood Whisperer
Steve Schuler of The Literary Workshop Blog
Chris Adkins of High Rock Woodworking
Tom Lovino of Tom's Workbench
Dyami Plotke of the Penultimate Woodshop

Everyone on the panel was very willing to share successes as well as frustrations and failures.  It seems that just about everyone encountered some of the same problems at one time or another but their message of stick-to-it-ness really came through loud and clear.  Whether you are just starting your woodworking journey or you are looking to add that next level to your skill set, I encourage everyone to check out each of these web pages.  Each of these sites has something different to offer in terms of skill sets and information. One common theme among all of these sites, however, is the passion that goes into creating them, and the willingness to share their knowledge.  You don't, however, have to start a website to share your experience with someone else.  If you are a woodworker or a maker, please find someone to share your knowledge with and encourage them to make something.  The reward is unparalleled, I assure you.


10.28.2013

A Bridge To Nowhere.

Like a lot of adults with a misspent youth can say, I used to be in a band.  We played a lot of rock and punk music because that's what garage bands were supposed to play, and that is what my friends and I were into. I would never have admitted it to my friends then, but I really liked bluegrass.  Particularly, I liked and still really enjoy the banjo. I always wanted to learn to play one, but until recently, I never took that dream particularly seriously.   It just so happened that my wife's parents had one buried in their attic, along with the obligatory creepy attic contents proper old houses are supposed to have.  I asked to borrow it and they obliged with eyebrows raised, really?  The banjo?  My wife, who thinks banjos sound like cats caught in a shop vac, said the same thing. I brought the banjo home and opened the cardboard box it was kept in and realized that it was unplayable.  It was missing a bridge, a little (usually wooden) piece just before the end of the banjo that keeps the strings up off of the head, allows them to vibrate freely, and to make that oh so sweet sound.

My first thought about the missing bridge was, uh-oh I bet those are expensive (they aren't).  Against her better judgement, my wife said, "why don't you just make one, they are basically just a wooden block."  It was that moment I realized I could kill two birds with one banjo.  I could get out in my shop for a while, a rarity these past couple of weeks, and I could make my own bridge.

I went out to my refuge and grabbed a couple of walnut cutoffs from my milled walnut tree and an old piece of ebony I have been holding on to for just such an occasion, and quickly realized I had no idea what I was doing.  After returning to the house and scouring the trusty old internet for a while, I found a great reference website for my project.  Http://banjobridge.com/ has a ton of information if you are curious about making a bridge for a banjo.  Whats that you say?  You're a guitar enthusiast?  A cursory "Google" search for "make a guitar bridge" also turned up about 45 million results, so if you are interested, give it a shot.

Now armed with just enough information to be dangerous, I returned to butchering my walnut. With a hatchet, I split a large tapered piece (so the bridge would be quarter sawn) from the scrap.  I then cut a small piece with a handsaw, now tapered from 1/2 in to 3/4 in and about four inches long. Then I cut a thin piece, about 1/4 in by 3 in, of ebony.  I must apologize for the ridiculously staged, after-the-fact photos.  I was happily photographing my process along the way, and then realized I had no memory card in my camera.  I thought the days of no film in the camera were long gone, but apparently technology doesn't cure stupidity.  So, please ignore the obvious fact that the steps don't seem to follow the order in the photographs. Use your imagination.


I used a small block plane to straighten up the top and bottom of the walnut piece and to clean up the bottom edge of the ebony strip.  Then I glued the two pieces together with the ebony strip on the small end of the tapered walnut.

At this point a molding plane would have been handy, but I was able to successfully shape the concave profile using a carving gouge.  Scratch stock might have worked well here as well, and if I was going to make several more of these I'd give it a try.

Shaping A Concave Profile With A Carving Gouge
Concave Profile


Next, I shaped the "feet" with a round file, by just happily filing away until I got bored found success.


I then shaped the sweep on the sides with another carving gouge.  This worked much better than I thought, however, I did hone the gouge to within an inch of its life to assure it was razor sharp before I used it to lop off the edges.


Because the tools I used to shape the bridge were good and sharp I barely had to do any sanding, but I did clean up some edges with a little 250 grit sandpaper.

A tip I got from banjobridge.com which worked really well, was to use welding tip cleaners to form the tiny grooves/slots in the ebony for the strings to sit in.  This tool, if you aren't familiar, is a little metal container full of tiny round metal files used for cleaning out the tips on welding torches.  They are great for cleaning out all kinds of tiny openings and they are usually under five bucks at your local hardware store.  I just matched the size of the file to the size of the coordinating banjo string and filed in the groove.  They worked perfectly!

Welding Tip Cleaners


Filing In The String Slots


Finished Slots

I finished the bridge with a couple coats of beeswax rubbed in with a cotton cloth and it darkened up the walnut nicely.  I used George's Club House Wax, not because I'm going to eat the bridge, but because it's just beeswax and mineral oil and I didn't want anything funky seeping out onto the banjo head.


I'm certainly not going to become the next Antonio Stradavari, but for my very first venture into making an instrument accessory I was pretty happy.  Now, if I could just learn how to play the darn thing!

10.18.2013

Woodworking In America 2013

I have an admission to make.  I haven't been in my shop in over a week and a half.  It physically pains me to make that statement.  I have been getting a number of other things squared away so I can attend the Woodworking In America conference this year.  After a drive through the night, and coffee fueled morning, I was able to stay awake for the entire first day of classes.  If you have never been to a WIA conference before, I would highly recommend the trip.  Just like I did last year, as these classes become pertinent to projects I'm doing, I'll post the my notes and photos of some of the classes I have attended.  This conference is a great learning and networking opportunity, but most importantly it gets me excited to get back in my shop.

The day started off with a class from Mr. Glen Huey about the proper use of a powered jointer and thickness planer for stock prep/milling.  I don't own a jointer but I know a guy who does, and he may be getting a phone call from me soon.  I snuck out a little early from that class to attend a class titled TIMBER!!! given by Mr. Roy Underhill.  I wasn't sure what to expect from this class, but I am absolutely glad I attended.  He essentially walked through the steps of squaring a log by hand.  I recently posted on this very topic and I was so glad to get the detailed instruction.  While this is a labor intensive project I actually might give this a try now that I know what is really involved.  I'll post on my attempt (hopefully this fall) and include the instructions I got today.  In the mean time, however, I'll leave you with some photos of Mr. Underhill doing what he does best.  More to come...

Take That Powerpoint!!!
What To Do, What To Do....

Success!!
No, Not Really...

Broad Axe
All Squared Away


10.01.2013

Turn Of The Screw.

As I have confessed on more than one occasion and to anyone who will stand still long enough, I love antique hand tools.  I have, however, in the most recent years started to be a bit more choosy about what I purchase and include in my collection.  I'm not becoming choosy because I only want to collect pristine works of art (unless I come across something really special and my wife isn't looking), on the contrary, I am being more particular about buying tools that I think I'll actually use.  I am not a true collector (in the strictest definition of the word) as I restore and use many of the tools I collect.  A few dings, dents, user repairs and signs of use are something I actually enjoy about old hand tools.  I have several new acquisitions that will undoubtedly help me round out my "collection" and will hopefully serve as patterns for some future Polthaus tools, if the stars align.

One tool that I have been pleasantly surprised by has been a 1 inch Marples screw box (sounds dirty, but I assure you it is not...well maybe a little).  This little guy turns a one inch dowel into a 5tpi wooden screw which is a lower tpi than many of the modern boxes which are often 8tpi.  I got this to make something totally unrelated to my woodworking addiction, but it turned out to work so well that I couldn't part with it after its first use. Unfortunately though, I purchased this one at a real discount because it is missing the tap (a rather critical part if you actually want the screws to work).  I believe, however, that I can make a replacement with my South Bend, a dash of elbow grease and generous helping of time and do-overs.  Once the tap is made, this will make some nice wooden screws for a shop made Moxon Vise (on the cheap) which will undoubtedly be added to my traveling tool box.

Marples Screw Cutting Box With Factory Test Piece
The Chips Come Out Of The Mortise In The Side
I have come across some of these screw boxes in the past and, unfortunately, unless they are in decent shape they aren't really worth the wood they are made from.  If the threads inside the box get broken or if the box won't stay shut, it is better to move along to the next one.  You could also buy the broken one for the cutter and and tap (assuming it is still located with the box) and make your own box.

And On The Inside...
Here You Can See The Cutter Adjustment Screws

Simple Cutter Geometry Makes This Easy To Sharpen and Hone
After a quick honing of the triangular cutter on a leather paddle, I cut a poplar screw as a test piece and it turned out really well.  I think a harder wood like maple would produce better threads but even in the softer poplar I got well defined deep grooves and nice strong threads with a single pass through the box.  A nice feature about the box is that it was created with a tapered tap.  This results in the exit threads at the bottom of the box being just ever so slightly narrower than the starting threads at the top of the box, so that upon exiting the box the threads are burnished.  Once I get the accompanying tap made for this thing and I can actually put the screws to use I'll be one happy camper with one less loose screw...sorry I couldn't resist.

Poplar Wooden Screw Test Piece
And now I will part with the chant of my old Air Force Civil Engineers drinking Softball Team  "Nuts And Bolts, Nuts And Bolts...We. Got. Screwed!"  We didn't win very many games..

9.11.2013

I've Been Shedding.

The last few weekends I have been fortunate.  My wife has demanded that I finish some projects around the house.  Normally, I would probably whine and complain about having to finish projects because those projects are usually things like organizing the filing cabinet, sharpening crayons, dusting under the bed, and arranging the pantry into alphabetical order.  These projects, however, are much more fun.  Finishing the shed, is the unfinished job (one of hundreds) I have been focusing on lately.

Almost Finished...
In addition to shingling the roof (boring asphalt on one side and metal panels on the other) I decided to shingle the walls, with cedar shingles.  One note I'd like to make up front is that this is my first experience with installing cedar shingles.  I did receive some advice from someone who used to install these for a living, and I did some research on my own.  After working with them for a few days, I'd say that a project this size is perfect for someone looking to learn a little about the basics of working with these.  I decided to go with cedar shingles as opposed to shakes as that is what my local hardware store had in stock.  Just a quick mention (as it was explained to me in rather passionate detail) is that shingles are typically milled/sawn on both sides, while shakes are split (typically by hand) on one or both faces.  As a result, shingles are more uniform in appearance than true shakes.  I would also recommend taking my friends advice and be very wary about purchasing cedar shingles from a big box hardware store.  I got a mix of 3 and 4s from my local big box and quickly realized that they were one step away from mulch. I realize that 3 and 4s are the bottom of the bunch, but these were worse than I expected.  These are pretty much thrown together into ungraded bundles and shipped out the door to make a buck.  Fortunately, due to some rather aggressive roof overhangs these shingles won't actually get too much weather.  If I were doing a larger project, a roof, or something that required a more consistent appearance, I would likely order higher grade shingles or shakes from a reputable mill/producer or dealer in hopes that I'd get a more consistent and better quality product.

That being said this was a good learning experience (although I am not quite finished...).  I split all the shingles to width (when needed) with a carpenters hatchet that I refurbished last year, and more complicated cuts included the use of a handsaw and a chisel.  Most of the shingles had decently straight grain so they split fairly easily.  I didn't need to plug in my miter saw at all, which let me work much more quietly and efficiently (although I did use a pneumatic roofing nailer to install the shingles).  Being able to cut/split everything without having to walk all over the place was nice.  As with all construction techniques, there are a million and one ways to install cedar shingles.  The thing I like about shingled siding is that depending on the installation technique the shingles can look perfectly trimmed and modern or they can be more rustic and imperfect.  I intentionally installed these in a slightly random fashion to keep some visual interest.  I followed along each row with a short level to make sure I wasn't getting too far out, but everything else, with exception of the first course, was just installed via a well calibrated eyeball (I winged it).  I did the first course and undercourse like the diagram below:


Illustration from http://www.cedarbureau.org

The North Side
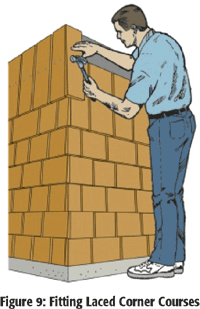
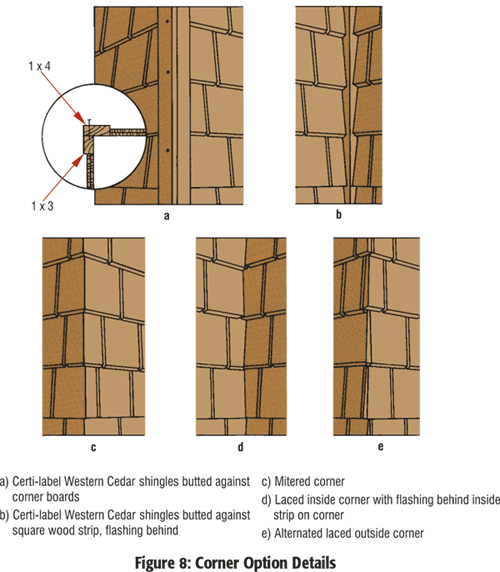
I opted for site-made cedar "j-channel" (not installed yet) which will just be two staggered pieces of cedar trim on the corners of the shed to keep weather off of the very edges of the corners.  Another technique that I think would have worked well is to lace the corners, which looks nice.
Illustration from http://www.cedarbureau.org
Other techniques:
Illustration from  http://www.cedarbureau.org

Maybe for the next shed I'll split my own shakes like this guy...

8.16.2013

Thank Hew!

O.P.V
Other People's Videos

I realize I just put up an O.P.V. post.  Normally I try to space them out, but in this instance I don't care. This is another video from John Neeman toolworks, however, this one doesn't revolve around making tools as much as it focuses on those using the tools.

Hand hewing logs is an ancient skill with roots in everything from homebuilding to barn raising.  In fact, water powered sawmills date back to the 6th century AD and have been improved upon consistently in the ages since.  By the 16th century sawmills were strewn about Europe and were a fairly common among developing communities.  The need for hand hewn logs has been slowly dwindling since the advent of the efficient sawmill.  That is not at all to say that people haven't continued hewing logs by hand since the first axe was forged.  People in rural areas or without the means to purchase milled lumber, would often resort to hewing their logs by hand.  Thanks to many strong bodied craftsmen, this art form has been kept alive.  This video is from Latvia, but there are several outfits in the US that still shape lumber by hand.  In fact, if you are interested, Mr. Peter Follansbee has some specific instruction on the matter in his blog.

As an additional note, in this video at 3:16 there is an ingenious idea for holding work on a job site that I'd recommend everyone check out.  There is further demonstration of the technique at 4:19.  I'll be giving this a try in the very near future.

I enjoyed this video, not enough to go out and hew beams by hand, but enough to motivate me to go build something...maybe my wife won't miss me for a few weekends...


8.02.2013

Dying For Another Project

O.P.V.
Other People's Videos

I stumbled across this video the other day, and have found myself occasionally thinking about it since.  It has become more inspirational the more I have thought about what Mr. Daly is actually doing in the video. Beyond doing a beautiful job hand building wooden coffins, he is creating something with his hands in his workshop that will be the last resting place for a human being.  I have made a lot of things in my life, but none seemingly as important as an eternal resting place.  The care and attention he appears to give to his work (which will eventually be buried in the ground) is motivational to me and I hope to others.  I encourage you to watch this video and give its contents some real thought.  When we make something with our hands I feel that we leave a part of ourselves with that object.  I try hard not to loose sight of the fact that many of the things I make will far outlive me (hopefully), but sometimes it helps to watch someone give great care to something that they know will be destroyed.  I have read about other woodworkers building their own coffins, and there are even classes on the subject.  Perhaps this would be a good project...someday.


7.12.2013

Worth Your Time.

Finally, I have posted something on this site worth reading... fortunately for you it wasn't written by me.  A new blog is actively emerging from the brain of Mr. Don Williams, and based on its early development it promises to be an excellent resource.  I'll be following along with his writings to, among many other things, follow the behind the scenes looks at the HO Studley project.  Good luck to you Mr. Williams and thank you for creating this blog!

the Barn at White Run
http://donsbarn.com/

7.10.2013

British Invasion.

This is how I have appeared to my mail carrier for the last few weeks... he is very grumpy.


My addiction has been acting up again, and I have been scouring the interwebs for some antique tools that have been on my waiting list.  Several of my finds are coming from the good old UK and as such they sometimes take a while to ship.  As a result, when a package shows up with a Royal Mail stamp I loose my $#*&  calm and scream like a fifteen year old girl at a Beatles concert (my neighbors are waiting for the men in white coats to come carry me away).  The most recent arrival is an Eclipse No.36 sharpening guide.  This is the one on which Lie Nielsen based their sharpening guide design, and I must say I think I prefer the
original.


I don't always use a sharpening guide as I do a lot of my sharpening freehand.  I do use a guide when I am initially setting a bevel on a tool or I am sharpening something for someone else because I like to make sure the tool's bevel starts at a precise angle.  I love my Veritas MKII sharpening guide, but I was starting to get the 'seven year itch' and wanted to see what else was out there.  I have used this eclipse a couple of times since its arrival and already and I must say I like it the best of the side clamping sharpening guides I have used.  It clamps tightly and rolls freely, it's heavy (not plastic) and looks like it'll stand up to many years of use.  Additionally, I like that the company stamped the protrusion distances and corresponding angles right on the tool.  I am going to make a wooden shortcut guide as can be seen in this LumberJocks thread (I'm also looking for the Record No.161 that is shown there...but don't tell my wife).  This Eclipse will find its way into my traveling tool kit as it is small and effective.  I give this little guy two thumbs up and recommend digging around for one if you are considering a side clamping honing guide.


6.20.2013

Milling Around.

I'm still rather new to celebrating Father's Day as a father, so I'm still not sure of my favorite way to spend the "holiday."  I do know, however, that this year's Father's Day celebration at our house was the best one yet.  I got some extra sleep, had a great breakfast, spent some quality time with the family and then headed for the great outdoors (my backyard).  I spent a portion of my afternoon setting up my Alaskan MKIII chainsaw mill and then got up close and personal with some logs that have been eating up space in my yard for way too long.  

6.07.2013

Data Collection.

It warms my heart to think that some lowly agent at the NSA has likely been forced to read a PHW blog post or two and has had to spend his or her valuable time watching one of my sharpening videos.  I can see him reading a post about milling a walnut tree, then getting bored with what I have to say and following one of the links on my blog to a real woodworking site that may have inspired him to actually give woodworking a try.  After all, NSA agents aren't likely immune to the web surfing addiction that the rest of us fall victim to, in fact, it seems they are actually encouraged to roam around on the interwebs.  All this talk lately of data collection got me thinking about some data I have personally been mining recently.  Unfortunately, my Internet hacking abilities stop at logging into my email.  As a result, I have been forced to collect data the old fashioned way... by doing something, then looking at what I have done and saying "oh crap...well I'd better start over."

Ms. Mary May Showing Everyone How It's Done

Partially Finished Ball And Claw


5.28.2013

Spring Cleaning.

Spring cleaning might be my second favorite cleaning activity.  My first favorite cleaning activity is putting off spring cleaning until tomorrow, repeatedly.  I probably could have continued to put off cleaning out my shop if it weren't for the fact that I have to share my space.  I currently share my shop space with items that don't work wood or metal very well, like bicycles and gardening tools.  These items, while enjoyed by my wife and child, often seem to me to be eating up valuable tool storage space (or space I could use for walking).  I have had plans in my mind for a shed for quite some time, and recently got up the nerve to spend some time on one.  The intent is to stop filling my lawnmower air filter with sawdust and to stop falling over bicycles and the string trimmer.   

Fortunately, buried under a bunch of stuff, I have enough tools to build such a shed.  I got the shed mostly dried in and started fitting the doors this weekend.  I kept the doors simple, 2x4 construction sheathed with plywood.  Fortunately, handplanes work for truing up crappy big-box store 2x4s as well as they work on seasoned figured cherry.  


Now that I have a lockable storage space, I have started cleaning out the "non-essentials" from my work space, including some of my unintended lumber collection (leftovers and projects-to-be).  Once I have cleaned and organized the shop a little (more to do over the next few weekends) I intend to start the construction of my long procrastinated awaited Roubo-styled bench.  It is amazing how much junk gets stuffed away during the winter months only to resurface in the spring.  This includes some scraps which will soon become saw totes (posts to come soon!) for a Disston recreation.  

Even the neighborhood cats have started storing stuff in my shop.


5.15.2013

It's Better To Burn Out Than To Rust.

Every year in late spring, I start preparing for my underwater workshop.  Humidity in Maryland in the summer is ridiculous, some days it feels like I am swimming in the shop.  Unfortunately, with humid weather comes another summer pest.... rust.  I have found some great techniques and products over the years to help me combat the ravages of rust, I wrote a quick post a while ago about some plane "socks" that have proven to work excellently at preventing rust.  Hopefully, I'll be adding some humidity control into the workshop this year so that should help tremendously.  Keeping rust at bay is one thing, but once it has sunken its hungry teeth into a tool, removing it can be an adventure all its own.

Rusty Antique Vise Grips

5.08.2013

A Disordered Body.

O.P.V.
Other People's Videos

A weekend illness, enough cold medicine to kill a horse, and the fact that I turn into a teething two year old when I'm sick is the reason I am leaving you with another O.P.V. post so soon after the last one.  I wrote what I thought was a great post on rust removal this Monday, but when I reread it this morning, I realized that I might have been too high on cold medicine to write anything other than my name (and even that was iffy).  The obligatory spring rust removal entry will be forthcoming, however, in the mean time I will leave you with something that actually makes sense.

Basic Blacksmithing skills are an obvious choice to learn for the woodworker interested in making hand tools.  Throughout this year I'll be experimenting with some very small scale smithing techniques (both my skillset and shop space are very limited), and of course, I'll be posting the lessons learned and the results here.

This short video is a brief interview with Brittain's longest serving blacksmith, Mr. Hardy Fred Harriss, it is both inspirational and moving although it is only 1 minute and 43 seconds long.  Something about these videos featuring people in their golden years still adeptly working with their hands is comforting.  Mr. David Hedges did a wonderful job creating this video.

The second video is a bit longer and is more of an instructional video produced by Artisan Media (an excellent producer of well funded instructional videos).  The "Blacksmith At Work" video gives some interesting insight into a few blacksmith basics and shows how to make a rams head on the end of a tool.  Not extremely useful, but extremely cool.

Enjoy...I'm going back to fighting this fever...


In case you were wondering, the title came from this quote (sometimes I get these questions):
"In a disordered mind, as in a disordered body, soundness of health is impossible"
                                                                                        -Marcus Tillius Cicero

5.01.2013

Measure Twice...

The saying "Measure twice, cut once" used to drive me crazy.  I hated when my father would say it, especially when it was because I had made some seemingly inconsequential mistake.  It seemed so unnecessary to measure more than once, especially because I had already bought into the modern teachings of "It's close enough for government work," or, "I can't see it from my house."

I Love This Print From http://jeffpeachey.wordpress.com/2010/07/19/measure-twice-cut-once/
My father's voice, however, kept ringing in my ears the first time I made something for someone else.  It seemed no matter how hard I tried, I couldn't get the measurements accurate enough to close up the sloppy joints in a wall cabinet I was making for my mother.  I was mowing lawns and landscaping in the summer to make money while I was in high school, and spending ten or fifteen dollars on replacement lumber was a major dilemma.  As I look back on this little project now I can easily think of ten things I was doing wrong, including sloppy techniques (this was before I had discovered the miracle of sharp tools).  One of the biggest contributors to my inability to fit joints correctly was that I was in fact measuring too much.

4.23.2013

Make Your Mark.

Fast is fine, but accuracy is everything.
-Wyatt Earp

Although accuracy is not the same as precision, a good amount of both in woodworking pays dividends in assembly and the appearance of the final product.  Practice in the craft is the first way to get better at both, but decent tools don't hurt!  My first line of defense against a sloppy project is an appropriate marking tool.  I say appropriate  because the marking tool I choose to use depends on several factors.  I have a plethora of mark makers in the shop, some are good for rough scrawls and some leave hairs-width straight lines.  

4.02.2013

Traveling Bench

Forgive me Roy, for I have sinned.  I let yet another project sit half finished for way too long.  I posted a short piece on a traveling workbench I am building which will allow me to do some "vacation woodworking."  I let the traveling bench sit for a while because I saw two different designs at the WIA 2012 show that gave me some ideas to steal to consider incorporating.  One was the famous sawyers bench/sitting workbench by Mr. Ron Herman.  

Mr. Herman's small travel bench is great because the basic design can be adapted to your physical proportions, so no two benches are exactly alike.  You should be able to kneel on the bench with one leg while standing on the other, so approximate the height to the bottom of your knee.  The length is up to you (though it provides a nice place to take a post lunch nap if you make it long enough), and it should be about as wide as your money-maker to provide a comfortable sitting surface and will allow you to straddle the bench comfortably.  There, precise measurements, he threatened death if we used a ruler.  This travel bench seems best for most types of sawing and some basic chisel work.  The dog holes in the end work well for holdfasts and clamps to hold work perpendicular to the bench as well.  Oh, and it also holds lunch.  With some minor adaptations I think this bench could be a good one to add to my vacation "to-do" list.  
Mr. Herman's Sawyers Bench/Lunch Table
The second bench is slightly more involved but really got me thinking.  I want to be able to use my handplanes on vacation and at some work-sites so I'll also need a bench that works well while I'm standing up.  The one I am building doesn't  incorporate any built in vises, but it will accommodate ratcheting clamps, pipe clamps and holdfasts.  It will also stand on a pair of sawhorses, and strap to the bottom of my tool chest.  Here is a crappy drawing of my bench currently under construction.

Chicken Scratch Drawing Of Traveling Bench
(The Bench Is Upside Down To Show How It Will Fit With The Tool Chest)
I particularly like the design of the traveling bench I saw at WIA, however, because it can be used right on a kitchen table (with a clamp).  This would even allow me to work in my house when it is either 100 degrees or 10 degrees in my workshop... the tricky part is convincing my wife that this is a good idea...  If you are interested, Mr. Chris Schwarz is building some of these traveling benches for an article in Popular Woodworking soon, his blog entry on them can be found here.

Up Close And Personal With An Original

Ms. Megan Fitzpatrick Demonstrating The Antique Traveling Bench
At WIA 2012
I have made it a goal to finish my traveling bench before I go to the beach again this summer, so hopefully I'll make a good sacrifice to the spare time gods before June.