![]() |
| (Psssst...It's A Shooting Board/Bench Hook) |
11.21.2013
Just Shoot Me.
11.14.2013
"The Ox" - Words Fail Me.
O.P.V.
Other People's Videos
I was in the middle of writing my post for this week, and I paused for a moment to watch a video (I'm easily distracted and I'm a short film addict). After I watched the video, I sat speechless for a moment and put my post on hold so I could share this beautiful piece with you.
Everything about this short film impresses me. I am constantly searching for inspiration, which is partly why I love short documentaries about craftsmen, and this film didn't disappoint. Mr. Eric Hollenbeck owns and operates Blue Ox Millworks out of Eureka, California. He and his wife Viviana operate an architectural millwork company on the site, however, they also operate a school and a historic park on the grounds. Outside of the millworks the Hollenbecks also maintain a huge collection of human powered equipment from Barnes Manufacturing, a functioning blacksmith shop, a ceramics studio, a boatbuilding area, an apothecary where they make their own stains and varnishes, a plaster shop, a working print shop, a logging skid camp, a cook shack, a cafe, a herd of animals (including two Belgian Blue oxen), and knowledge and equipment for just about any other craft you could imagine. I bow before this man in true "I'm not worthy" fashion. I also enjoy his candor about his military service, his well thought out spring analogy, and the way his school is planning to help other veterans.
The director, Ben Proudfoot, should be immensely proud of his film. There is a lot going on in this ten minute spot, yet he has managed to keep it all cohesive and at the same time wrapped it in a beautiful package. I can't wait to watch his other films and I hope he has another coming soon!
Brace yourself for the overwhelming urge to run to your shop and make something.
11.07.2013
Give Thanks.
"If you are really thankful, what do you do? You share." - W. Clement Stone
It is the time of year, in America, where we are encouraged to to name the things for which we are thankful. I am really thankful for a lot of things this year, safer welding helmets, x-ray vision, mind control, twerking, The Lady's Brunch Burger, and this! On a more relevant note, I am really thankful for folks willing to share their woodworking, toolmaking and maker experiences online. I wrote a ridiculous article on this serious topic a while ago: World Wide Woodworking. My belief in the willingness of woodworkers to share, both good and bad experiences, was reinforced this year at the WIA conference. Nine online pioneers were asked to speak at an "online round-table" to discuss what they do, why they do what they do, and some of their experiences.
This round-table, to me, was just as useful as the excellent class on cutting dovetails. Kudos to Ms. Megan Fitzpatrick and her staff for putting this together. So many woodworkers both brand new and "well-seasoned" don't have access to costly classes, conferences, or apprenticeships. The dwindling emphasis on the industrial arts in schools also means that these skills aren't necessarily being taught in classrooms anymore either. The large (and growing) group of online makers has encouraged many people, especially of the younger generations, to try making something with their hands. Those folks then are able to share what they made, with thousands of people, with just the click of a mouse.
The group of folks chosen for the WIA 2013 online community round-table included:
(from right to left in the photo above)
Ellis Walentine of Woodcentral.com and formerly of American Woodworker Magazine
Matt Vanderlist of Matt's Basement Workshop
Shannon Rogers of The Renaissance Woodworker
Wilbur Pan of giant Cypress
Mark Spagnuolo of The Wood Whisperer
Steve Schuler of The Literary Workshop Blog
Chris Adkins of High Rock Woodworking
Tom Lovino of Tom's Workbench
Dyami Plotke of the Penultimate Woodshop
Everyone on the panel was very willing to share successes as well as frustrations and failures. It seems that just about everyone encountered some of the same problems at one time or another but their message of stick-to-it-ness really came through loud and clear. Whether you are just starting your woodworking journey or you are looking to add that next level to your skill set, I encourage everyone to check out each of these web pages. Each of these sites has something different to offer in terms of skill sets and information. One common theme among all of these sites, however, is the passion that goes into creating them, and the willingness to share their knowledge. You don't, however, have to start a website to share your experience with someone else. If you are a woodworker or a maker, please find someone to share your knowledge with and encourage them to make something. The reward is unparalleled, I assure you.
10.28.2013
A Bridge To Nowhere.
Like a lot of adults with a misspent youth can say, I used to be in a band. We played a lot of rock and punk music because that's what garage bands were supposed to play, and that is what my friends and I were into. I would never have admitted it to my friends then, but I really liked bluegrass. Particularly, I liked and still really enjoy the banjo. I always wanted to learn to play one, but until recently, I never took that dream particularly seriously. It just so happened that my wife's parents had one buried in their attic, along with the obligatory creepy attic contents proper old houses are supposed to have. I asked to borrow it and they obliged with eyebrows raised, really? The banjo? My wife, who thinks banjos sound like cats caught in a shop vac, said the same thing. I brought the banjo home and opened the cardboard box it was kept in and realized that it was unplayable. It was missing a bridge, a little (usually wooden) piece just before the end of the banjo that keeps the strings up off of the head, allows them to vibrate freely, and to make that oh so sweet sound.
My first thought about the missing bridge was, uh-oh I bet those are expensive (they aren't). Against her better judgement, my wife said, "why don't you just make one, they are basically just a wooden block." It was that moment I realized I could kill two birds with one banjo. I could get out in my shop for a while, a rarity these past couple of weeks, and I could make my own bridge.
I went out to my refuge and grabbed a couple of walnut cutoffs from my milled walnut tree and an old piece of ebony I have been holding on to for just such an occasion, and quickly realized I had no idea what I was doing. After returning to the house and scouring the trusty old internet for a while, I found a great reference website for my project. Http://banjobridge.com/ has a ton of information if you are curious about making a bridge for a banjo. Whats that you say? You're a guitar enthusiast? A cursory "Google" search for "make a guitar bridge" also turned up about 45 million results, so if you are interested, give it a shot.
Now armed with just enough information to be dangerous, I returned to butchering my walnut. With a hatchet, I split a large tapered piece (so the bridge would be quarter sawn) from the scrap. I then cut a small piece with a handsaw, now tapered from 1/2 in to 3/4 in and about four inches long. Then I cut a thin piece, about 1/4 in by 3 in, of ebony. I must apologize for the ridiculously staged, after-the-fact photos. I was happily photographing my process along the way, and then realized I had no memory card in my camera. I thought the days of no film in the camera were long gone, but apparently technology doesn't cure stupidity. So, please ignore the obvious fact that the steps don't seem to follow the order in the photographs. Use your imagination.
I used a small block plane to straighten up the top and bottom of the walnut piece and to clean up the bottom edge of the ebony strip. Then I glued the two pieces together with the ebony strip on the small end of the tapered walnut.
At this point a molding plane would have been handy, but I was able to successfully shape the concave profile using a carving gouge. Scratch stock might have worked well here as well, and if I was going to make several more of these I'd give it a try.
Next, I shaped the "feet" with a round file, by just happily filing away until Igot bored found success.


I then shaped the sweep on the sides with another carving gouge. This worked much better than I thought, however, I did hone the gouge to within an inch of its life to assure it was razor sharp before I used it to lop off the edges.
Because the tools I used to shape the bridge were good and sharp I barely had to do any sanding, but I did clean up some edges with a little 250 grit sandpaper.
A tip I got from banjobridge.com which worked really well, was to use welding tip cleaners to form the tiny grooves/slots in the ebony for the strings to sit in. This tool, if you aren't familiar, is a little metal container full of tiny round metal files used for cleaning out the tips on welding torches. They are great for cleaning out all kinds of tiny openings and they are usually under five bucks at your local hardware store. I just matched the size of the file to the size of the coordinating banjo string and filed in the groove. They worked perfectly!
I finished the bridge with a couple coats of beeswax rubbed in with a cotton cloth and it darkened up the walnut nicely. I used George's Club House Wax, not because I'm going to eat the bridge, but because it's just beeswax and mineral oil and I didn't want anything funky seeping out onto the banjo head.
I'm certainly not going to become the next Antonio Stradavari, but for my very first venture into making an instrument accessory I was pretty happy. Now, if I could just learn how to play the darn thing!
I went out to my refuge and grabbed a couple of walnut cutoffs from my milled walnut tree and an old piece of ebony I have been holding on to for just such an occasion, and quickly realized I had no idea what I was doing. After returning to the house and scouring the trusty old internet for a while, I found a great reference website for my project. Http://banjobridge.com/ has a ton of information if you are curious about making a bridge for a banjo. Whats that you say? You're a guitar enthusiast? A cursory "Google" search for "make a guitar bridge" also turned up about 45 million results, so if you are interested, give it a shot.
Now armed with just enough information to be dangerous, I returned to butchering my walnut. With a hatchet, I split a large tapered piece (so the bridge would be quarter sawn) from the scrap. I then cut a small piece with a handsaw, now tapered from 1/2 in to 3/4 in and about four inches long. Then I cut a thin piece, about 1/4 in by 3 in, of ebony. I must apologize for the ridiculously staged, after-the-fact photos. I was happily photographing my process along the way, and then realized I had no memory card in my camera. I thought the days of no film in the camera were long gone, but apparently technology doesn't cure stupidity. So, please ignore the obvious fact that the steps don't seem to follow the order in the photographs. Use your imagination.
I used a small block plane to straighten up the top and bottom of the walnut piece and to clean up the bottom edge of the ebony strip. Then I glued the two pieces together with the ebony strip on the small end of the tapered walnut.
![]() |
| Shaping A Concave Profile With A Carving Gouge |
| Concave Profile |
Next, I shaped the "feet" with a round file, by just happily filing away until I
I then shaped the sweep on the sides with another carving gouge. This worked much better than I thought, however, I did hone the gouge to within an inch of its life to assure it was razor sharp before I used it to lop off the edges.
Because the tools I used to shape the bridge were good and sharp I barely had to do any sanding, but I did clean up some edges with a little 250 grit sandpaper.
A tip I got from banjobridge.com which worked really well, was to use welding tip cleaners to form the tiny grooves/slots in the ebony for the strings to sit in. This tool, if you aren't familiar, is a little metal container full of tiny round metal files used for cleaning out the tips on welding torches. They are great for cleaning out all kinds of tiny openings and they are usually under five bucks at your local hardware store. I just matched the size of the file to the size of the coordinating banjo string and filed in the groove. They worked perfectly!
| Welding Tip Cleaners |
| Filing In The String Slots |
| Finished Slots |
I finished the bridge with a couple coats of beeswax rubbed in with a cotton cloth and it darkened up the walnut nicely. I used George's Club House Wax, not because I'm going to eat the bridge, but because it's just beeswax and mineral oil and I didn't want anything funky seeping out onto the banjo head.
I'm certainly not going to become the next Antonio Stradavari, but for my very first venture into making an instrument accessory I was pretty happy. Now, if I could just learn how to play the darn thing!
10.18.2013
Woodworking In America 2013
I have an admission to make. I haven't been in my shop in over a week and a half. It physically pains me to make that statement. I have been getting a number of other things squared away so I can attend the Woodworking In America conference this year. After a drive through the night, and coffee fueled morning, I was able to stay awake for the entire first day of classes. If you have never been to a WIA conference before, I would highly recommend the trip. Just like I did last year, as these classes become pertinent to projects I'm doing, I'll post the my notes and photos of some of the classes I have attended. This conference is a great learning and networking opportunity, but most importantly it gets me excited to get back in my shop.
The day started off with a class from Mr. Glen Huey about the proper use of a powered jointer and thickness planer for stock prep/milling. I don't own a jointer but I know a guy who does, and he may be getting a phone call from me soon. I snuck out a little early from that class to attend a class titled TIMBER!!! given by Mr. Roy Underhill. I wasn't sure what to expect from this class, but I am absolutely glad I attended. He essentially walked through the steps of squaring a log by hand. I recently posted on this very topic and I was so glad to get the detailed instruction. While this is a labor intensive project I actually might give this a try now that I know what is really involved. I'll post on my attempt (hopefully this fall) and include the instructions I got today. In the mean time, however, I'll leave you with some photos of Mr. Underhill doing what he does best. More to come...
![]() |
| Take That Powerpoint!!! |
![]() |
| What To Do, What To Do.... |
![]() |
| Success!! |
![]() |
| No, Not Really... |
![]() |
| Broad Axe |
![]() |
| All Squared Away |
10.01.2013
Turn Of The Screw.
As I have confessed on more than one occasion and to anyone who will stand still long enough, I love antique hand tools. I have, however, in the most recent years started to be a bit more choosy about what I purchase and include in my collection. I'm not becoming choosy because I only want to collect pristine works of art (unless I come across something really special and my wife isn't looking), on the contrary, I am being more particular about buying tools that I think I'll actually use. I am not a true collector (in the strictest definition of the word) as I restore and use many of the tools I collect. A few dings, dents, user repairs and signs of use are something I actually enjoy about old hand tools. I have several new acquisitions that will undoubtedly help me round out my "collection" and will hopefully serve as patterns for some future Polthaus tools, if the stars align.
One tool that I have been pleasantly surprised by has been a 1 inch Marples screw box (sounds dirty, but I assure you it is not...well maybe a little). This little guy turns a one inch dowel into a 5tpi wooden screw which is a lower tpi than many of the modern boxes which are often 8tpi. I got this to make something totally unrelated to my woodworking addiction, but it turned out to work so well that I couldn't part with it after its first use. Unfortunately though, I purchased this one at a real discount because it is missing the tap (a rather critical part if you actually want the screws to work). I believe, however, that I can make a replacement with my South Bend, a dash of elbow grease and generous helping of time and do-overs. Once the tap is made, this will make some nice wooden screws for a shop made Moxon Vise (on the cheap) which will undoubtedly be added to my traveling tool box.
I have come across some of these screw boxes in the past and, unfortunately, unless they are in decent shape they aren't really worth the wood they are made from. If the threads inside the box get broken or if the box won't stay shut, it is better to move along to the next one. You could also buy the broken one for the cutter and and tap (assuming it is still located with the box) and make your own box.
After a quick honing of the triangular cutter on a leather paddle, I cut a poplar screw as a test piece and it turned out really well. I think a harder wood like maple would produce better threads but even in the softer poplar I got well defined deep grooves and nice strong threads with a single pass through the box. A nice feature about the box is that it was created with a tapered tap. This results in the exit threads at the bottom of the box being just ever so slightly narrower than the starting threads at the top of the box, so that upon exiting the box the threads are burnished. Once I get the accompanying tap made for this thing and I can actually put the screws to use I'll be one happy camper with one less loose screw...sorry I couldn't resist.
And now I will part with the chant of my old Air Force Civil Engineers drinking Softball Team "Nuts And Bolts, Nuts And Bolts...We. Got. Screwed!" We didn't win very many games..
One tool that I have been pleasantly surprised by has been a 1 inch Marples screw box (sounds dirty, but I assure you it is not...well maybe a little). This little guy turns a one inch dowel into a 5tpi wooden screw which is a lower tpi than many of the modern boxes which are often 8tpi. I got this to make something totally unrelated to my woodworking addiction, but it turned out to work so well that I couldn't part with it after its first use. Unfortunately though, I purchased this one at a real discount because it is missing the tap (a rather critical part if you actually want the screws to work). I believe, however, that I can make a replacement with my South Bend, a dash of elbow grease and generous helping of time and do-overs. Once the tap is made, this will make some nice wooden screws for a shop made Moxon Vise (on the cheap) which will undoubtedly be added to my traveling tool box.
![]() |
| Marples Screw Cutting Box With Factory Test Piece |
![]() |
| The Chips Come Out Of The Mortise In The Side |
![]() |
| And On The Inside... |
![]() |
| Here You Can See The Cutter Adjustment Screws |
![]() |
| Simple Cutter Geometry Makes This Easy To Sharpen and Hone |
![]() |
| Poplar Wooden Screw Test Piece |
9.11.2013
I've Been Shedding.
The last few weekends I have been fortunate. My wife has demanded that I finish some projects around the house. Normally, I would probably whine and complain about having to finish projects because those projects are usually things like organizing the filing cabinet, sharpening crayons, dusting under the bed, and arranging the pantry into alphabetical order. These projects, however, are much more fun. Finishing the shed, is the unfinished job (one of hundreds) I have been focusing on lately.
![]() |
| Almost Finished... |
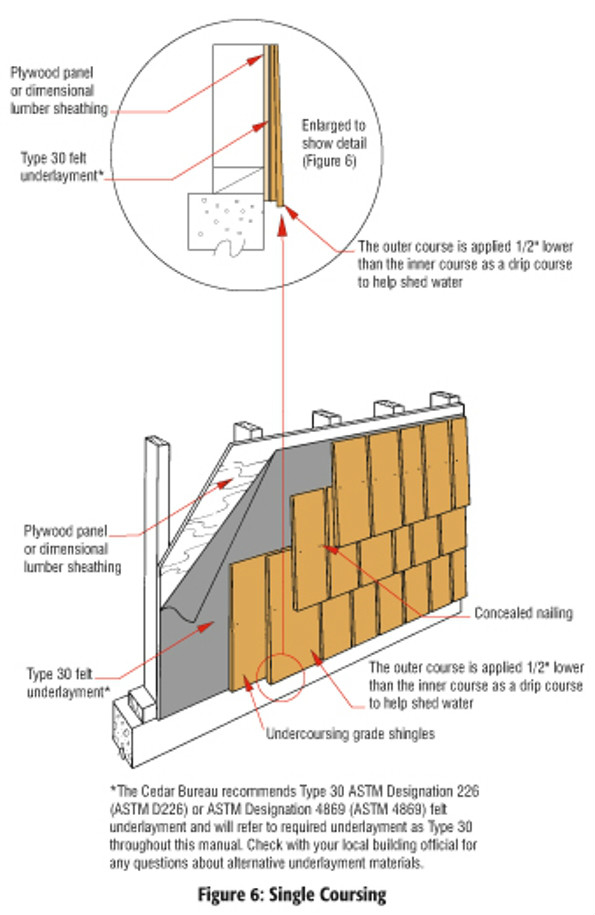
That being said this was a good learning experience (although I am not quite finished...). I split all the shingles to width (when needed) with a carpenters hatchet that I refurbished last year, and more complicated cuts included the use of a handsaw and a chisel. Most of the shingles had decently straight grain so they split fairly easily. I didn't need to plug in my miter saw at all, which let me work much more quietly and efficiently (although I did use a pneumatic roofing nailer to install the shingles). Being able to cut/split everything without having to walk all over the place was nice. As with all construction techniques, there are a million and one ways to install cedar shingles. The thing I like about shingled siding is that depending on the installation technique the shingles can look perfectly trimmed and modern or they can be more rustic and imperfect. I intentionally installed these in a slightly random fashion to keep some visual interest. I followed along each row with a short level to make sure I wasn't getting too far out, but everything else, with exception of the first course, was just installed via a well calibrated eyeball (I winged it). I did the first course and undercourse like the diagram below:
![]() |
![]() |
| The North Side |
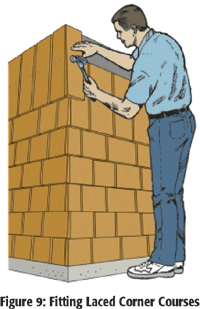
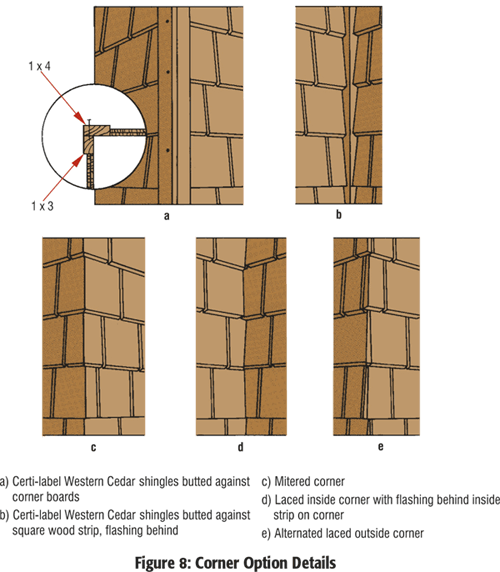
I opted for site-made cedar "j-channel" (not installed yet) which will just be two staggered pieces of cedar trim on the corners of the shed to keep weather off of the very edges of the corners. Another technique that I think would have worked well is to lace the corners, which looks nice.
Other techniques:
![]() |
| Illustration from http://www.cedarbureau.org |
![]() |
| Illustration from http://www.cedarbureau.org |
Maybe for the next shed I'll split my own shakes like this guy...
Subscribe to:
Posts (Atom)