9.11.2013

I've Been Shedding.

The last few weekends I have been fortunate.  My wife has demanded that I finish some projects around the house.  Normally, I would probably whine and complain about having to finish projects because those projects are usually things like organizing the filing cabinet, sharpening crayons, dusting under the bed, and arranging the pantry into alphabetical order.  These projects, however, are much more fun.  Finishing the shed, is the unfinished job (one of hundreds) I have been focusing on lately.

Almost Finished...
In addition to shingling the roof (boring asphalt on one side and metal panels on the other) I decided to shingle the walls, with cedar shingles.  One note I'd like to make up front is that this is my first experience with installing cedar shingles.  I did receive some advice from someone who used to install these for a living, and I did some research on my own.  After working with them for a few days, I'd say that a project this size is perfect for someone looking to learn a little about the basics of working with these.  I decided to go with cedar shingles as opposed to shakes as that is what my local hardware store had in stock.  Just a quick mention (as it was explained to me in rather passionate detail) is that shingles are typically milled/sawn on both sides, while shakes are split (typically by hand) on one or both faces.  As a result, shingles are more uniform in appearance than true shakes.  I would also recommend taking my friends advice and be very wary about purchasing cedar shingles from a big box hardware store.  I got a mix of 3 and 4s from my local big box and quickly realized that they were one step away from mulch. I realize that 3 and 4s are the bottom of the bunch, but these were worse than I expected.  These are pretty much thrown together into ungraded bundles and shipped out the door to make a buck.  Fortunately, due to some rather aggressive roof overhangs these shingles won't actually get too much weather.  If I were doing a larger project, a roof, or something that required a more consistent appearance, I would likely order higher grade shingles or shakes from a reputable mill/producer or dealer in hopes that I'd get a more consistent and better quality product.

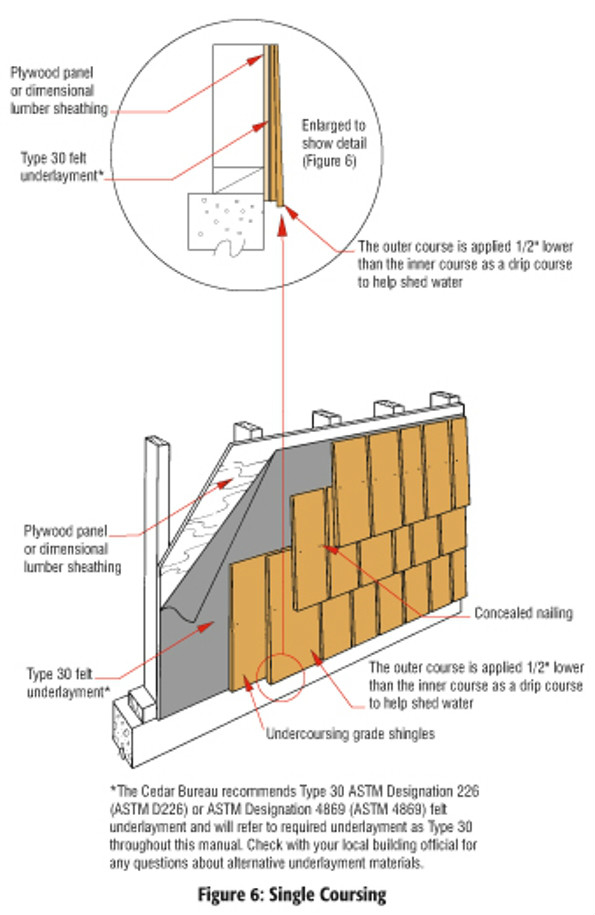
That being said this was a good learning experience (although I am not quite finished...).  I split all the shingles to width (when needed) with a carpenters hatchet that I refurbished last year, and more complicated cuts included the use of a handsaw and a chisel.  Most of the shingles had decently straight grain so they split fairly easily.  I didn't need to plug in my miter saw at all, which let me work much more quietly and efficiently (although I did use a pneumatic roofing nailer to install the shingles).  Being able to cut/split everything without having to walk all over the place was nice.  As with all construction techniques, there are a million and one ways to install cedar shingles.  The thing I like about shingled siding is that depending on the installation technique the shingles can look perfectly trimmed and modern or they can be more rustic and imperfect.  I intentionally installed these in a slightly random fashion to keep some visual interest.  I followed along each row with a short level to make sure I wasn't getting too far out, but everything else, with exception of the first course, was just installed via a well calibrated eyeball (I winged it).  I did the first course and undercourse like the diagram below:


Illustration from http://www.cedarbureau.org

The North Side
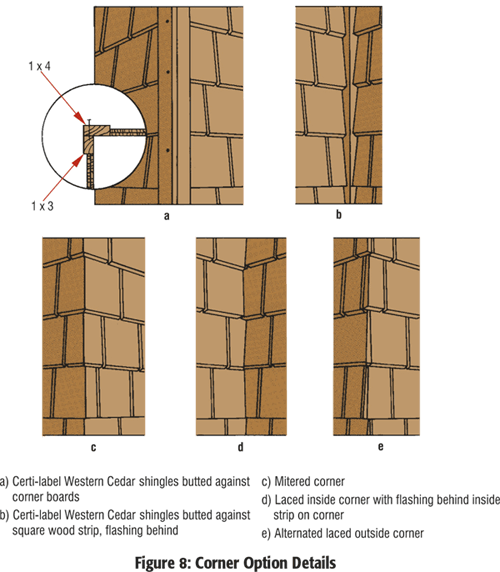
I opted for site-made cedar "j-channel" (not installed yet) which will just be two staggered pieces of cedar trim on the corners of the shed to keep weather off of the very edges of the corners.  Another technique that I think would have worked well is to lace the corners, which looks nice.
Illustration from http://www.cedarbureau.org
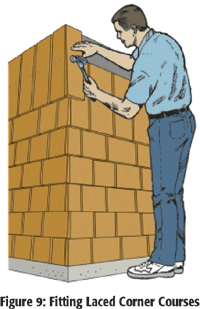
Other techniques:
Illustration from  http://www.cedarbureau.org

Maybe for the next shed I'll split my own shakes like this guy...

8.16.2013

Thank Hew!

O.P.V
Other People's Videos

I realize I just put up an O.P.V. post.  Normally I try to space them out, but in this instance I don't care. This is another video from John Neeman toolworks, however, this one doesn't revolve around making tools as much as it focuses on those using the tools.

Hand hewing logs is an ancient skill with roots in everything from homebuilding to barn raising.  In fact, water powered sawmills date back to the 6th century AD and have been improved upon consistently in the ages since.  By the 16th century sawmills were strewn about Europe and were a fairly common among developing communities.  The need for hand hewn logs has been slowly dwindling since the advent of the efficient sawmill.  That is not at all to say that people haven't continued hewing logs by hand since the first axe was forged.  People in rural areas or without the means to purchase milled lumber, would often resort to hewing their logs by hand.  Thanks to many strong bodied craftsmen, this art form has been kept alive.  This video is from Latvia, but there are several outfits in the US that still shape lumber by hand.  In fact, if you are interested, Mr. Peter Follansbee has some specific instruction on the matter in his blog.

As an additional note, in this video at 3:16 there is an ingenious idea for holding work on a job site that I'd recommend everyone check out.  There is further demonstration of the technique at 4:19.  I'll be giving this a try in the very near future.

I enjoyed this video, not enough to go out and hew beams by hand, but enough to motivate me to go build something...maybe my wife won't miss me for a few weekends...


8.02.2013

Dying For Another Project

O.P.V.
Other People's Videos

I stumbled across this video the other day, and have found myself occasionally thinking about it since.  It has become more inspirational the more I have thought about what Mr. Daly is actually doing in the video. Beyond doing a beautiful job hand building wooden coffins, he is creating something with his hands in his workshop that will be the last resting place for a human being.  I have made a lot of things in my life, but none seemingly as important as an eternal resting place.  The care and attention he appears to give to his work (which will eventually be buried in the ground) is motivational to me and I hope to others.  I encourage you to watch this video and give its contents some real thought.  When we make something with our hands I feel that we leave a part of ourselves with that object.  I try hard not to loose sight of the fact that many of the things I make will far outlive me (hopefully), but sometimes it helps to watch someone give great care to something that they know will be destroyed.  I have read about other woodworkers building their own coffins, and there are even classes on the subject.  Perhaps this would be a good project...someday.


7.12.2013

Worth Your Time.

Finally, I have posted something on this site worth reading... fortunately for you it wasn't written by me.  A new blog is actively emerging from the brain of Mr. Don Williams, and based on its early development it promises to be an excellent resource.  I'll be following along with his writings to, among many other things, follow the behind the scenes looks at the HO Studley project.  Good luck to you Mr. Williams and thank you for creating this blog!

the Barn at White Run
http://donsbarn.com/

7.10.2013

British Invasion.

This is how I have appeared to my mail carrier for the last few weeks... he is very grumpy.


My addiction has been acting up again, and I have been scouring the interwebs for some antique tools that have been on my waiting list.  Several of my finds are coming from the good old UK and as such they sometimes take a while to ship.  As a result, when a package shows up with a Royal Mail stamp I loose my $#*&  calm and scream like a fifteen year old girl at a Beatles concert (my neighbors are waiting for the men in white coats to come carry me away).  The most recent arrival is an Eclipse No.36 sharpening guide.  This is the one on which Lie Nielsen based their sharpening guide design, and I must say I think I prefer the
original.


I don't always use a sharpening guide as I do a lot of my sharpening freehand.  I do use a guide when I am initially setting a bevel on a tool or I am sharpening something for someone else because I like to make sure the tool's bevel starts at a precise angle.  I love my Veritas MKII sharpening guide, but I was starting to get the 'seven year itch' and wanted to see what else was out there.  I have used this eclipse a couple of times since its arrival and already and I must say I like it the best of the side clamping sharpening guides I have used.  It clamps tightly and rolls freely, it's heavy (not plastic) and looks like it'll stand up to many years of use.  Additionally, I like that the company stamped the protrusion distances and corresponding angles right on the tool.  I am going to make a wooden shortcut guide as can be seen in this LumberJocks thread (I'm also looking for the Record No.161 that is shown there...but don't tell my wife).  This Eclipse will find its way into my traveling tool kit as it is small and effective.  I give this little guy two thumbs up and recommend digging around for one if you are considering a side clamping honing guide.


6.20.2013

Milling Around.

I'm still rather new to celebrating Father's Day as a father, so I'm still not sure of my favorite way to spend the "holiday."  I do know, however, that this year's Father's Day celebration at our house was the best one yet.  I got some extra sleep, had a great breakfast, spent some quality time with the family and then headed for the great outdoors (my backyard).  I spent a portion of my afternoon setting up my Alaskan MKIII chainsaw mill and then got up close and personal with some logs that have been eating up space in my yard for way too long.  

6.07.2013

Data Collection.

It warms my heart to think that some lowly agent at the NSA has likely been forced to read a PHW blog post or two and has had to spend his or her valuable time watching one of my sharpening videos.  I can see him reading a post about milling a walnut tree, then getting bored with what I have to say and following one of the links on my blog to a real woodworking site that may have inspired him to actually give woodworking a try.  After all, NSA agents aren't likely immune to the web surfing addiction that the rest of us fall victim to, in fact, it seems they are actually encouraged to roam around on the interwebs.  All this talk lately of data collection got me thinking about some data I have personally been mining recently.  Unfortunately, my Internet hacking abilities stop at logging into my email.  As a result, I have been forced to collect data the old fashioned way... by doing something, then looking at what I have done and saying "oh crap...well I'd better start over."

Ms. Mary May Showing Everyone How It's Done

Partially Finished Ball And Claw